Guide: Software Bisque TheSkyX Initial Setup
I recently purchased a Series 6 MyT. Barely 2 months later I found a great deal on a Series 5 MX+ that I just couldn’t pass up. This meant it was time to learn TheSkyX. Anyone who uses TSX will tell you it can be very intimidating at first. It has a million buttons, menus, and sub-menus. It took a handful of sessions and some help from a patient friend (and long time Paramount user) to iron out all the kinks and nail down a solid workflow. Because TSX has changed so little over the years most of the videos published on its are 8+ years old. On top of that, the mounts user manual is extremely long. So I thought I’d write this blog post outlining the things that need to be don’t to get TSX up and running. This guide will be focusing on getting TSX set up so I won't be going into image the workflow.
Installation
1.1 Installing TSX
At the time of writing, when you buy a Paramount you also get a copy of TheSky Universal Bundle. This includes TheSky Profession, Camera+, Tpoint. You must register your new mount with Software Bisque in order to download TheSky from the SB website. If you bought a used mount and the seller didn’t include the software you can purchase TheSky and all its plugins directly from Software Bisque.
After registering, login to the SB website, click My Account, then Downloads. You need to download the base installer for whatever platform you’re using as well as the daily build installer. I am a Windows 11 users so I highlighted both files in the screenshot below.
If you plan to use a different capture software such as N.I.N.A. you will also need to download and install TheSky Controlled Telescope ASCOM driver which can be found HERE.

1.2 Launching & Registering TSX
Once installed you will have 2 versions of the software, TheSky Professional and TheSky Professional 64 bit. You want to use the 64 bit version unless you’re on an old computer that uses 32 bit architecture.
Launch TheSky and enter the serial number SB provides after you registered the mount.

2. Configuration
I want to keep this guide as short as possible so I’m going to riffle through these step with minimal explanation.
Enable TCP Server by clicking the Tools menu > TCP Server > Check Listening for connections. After enabling the server, close and re-open TSX.


2. Set Location by clicking the Input menu > Location. From there you can choose from a list of locations or click the Custom tab and manually enter coordinates. I chose the ladder.
Enter Name of location in the description field
Enter latitude
Enter longitude
Enter time zone
Enter elevation
DSO: Not observed (your milage may vary)

3. Telescope FOV
This step is optional. If you want to have a FOV window on the skk chart do the following:
Click the Display menu > Field of View Indicators…
Click the Equipment Tab
Expand the Telescopes and Detectors menus to add all your telescopes and cameras. You will notice that as you double click items they show up in the My Equipment section on the right.
Once done adding items, hold the CTRL key and click the associated telescope and camera which will highlight them.
Click Create My FOVIs
You will be taken to the My FOVIs tab. From here, any setup that you check will show as a FOV box on the sky chart.
If you have a telescope and/or camera that isn’t listed click the green + on the bottom left of the window and manually input your info.


4. Map Elements
This step is optional if you plan to use another planetarium but I find that it is still useful because some tasks are easier to use complete when using the TSX sky chart.
Click the Display menu > Chart Elements. I have the following items checked:
Celestial Objects
Moon
Planets
Sun
Stellar Objects
Double Star
Star
Variable Star
Reference Lines & Photos
Constellation Figures
Constellation Labels
Equatorial Grid (when needed)
Horizon Grid (ALT/AZ) (when needed)
Milky Way
Celestial North Arrow
Reference Objects
Reference Point
Telescope Limit
Pointing Target
It’s also a good idea to enable the Celestial Equator. Why this option isn’t in Chart Elements is beyond me.
Click the Input Menu > Database Manager > Optional Databases > Check the following:
Celestial Equator
Celestial Equator Label
Celestial Poles
Close Database Manager.
5. Connect Equipment
Click the Telescope, Camera, etc tabs on the right of the TSC window. If a tab is missing you can access it by clicking the Display menu and going down to Imaging System Windows. Click the Setup icon for each device and connect them to TSX. You will also want to Save Profile As at the bottom of the Imaging System Setup window especially if you have multiple setups or configurations.


6. Meridian Limits
Setting the meridian limits can be a little tricky the first time. Depending on the model, Paramounts can track up to 2 hours past the meridian. It is important to make sure the meridian limits in TSX don’t conflict with the meridian flip settings in your capture software. The key is to set the meridian limit in TSX to be GREATER than the meridian flip setting in your capture software but not so far that you can have a pier collision.
In my case, I have N.I.N.A. set to flip at the meridian so I set TSX meridian limit to 0.5 hours past. This way the limit will not kick in before N.I.N.A performs the flip at the meridian. If for some reason N.I.N.A. does not perform the flip, the TSX limit will eventually kick in and stop the mount tracking before a pier collision. You will need to carefully determine the appropriate meridian flip and limits for your specific setup.
Telescope tab > Tools > Bisque TSC > Mount Slew Limits
Select “OTA on the west side of pier” if in the Northern Hemisphere. Do East side of pier if in the Southern Hemisphere.
Set the maximum limit (in hours) and click the Set button. Alternatively you can slew your RA to where you want the limit to be and click the “Set Using Mount’s Current Position” button.
Click the Close button
Now on the Sky Chart you’ll notice a orange line next to the meridian line. This orange line is your meridian limit. You can click and hold the orange square to adjust the limit. As you can see the limit is currently set to 0.19 hours past the meridian. I would like to give N.I.N.A. a little more of a buffer since pier collisions aren’t an issue with my setup so I will use the orange square to increase the limit to 0.5 hours. Since N.I.N.A. is set to flip at the meridian, the gap between the green meridian line and the Orange meridian limit line represents the buffer zone that prevents the mount limit from interfering with N.I.N.A. flip settings.


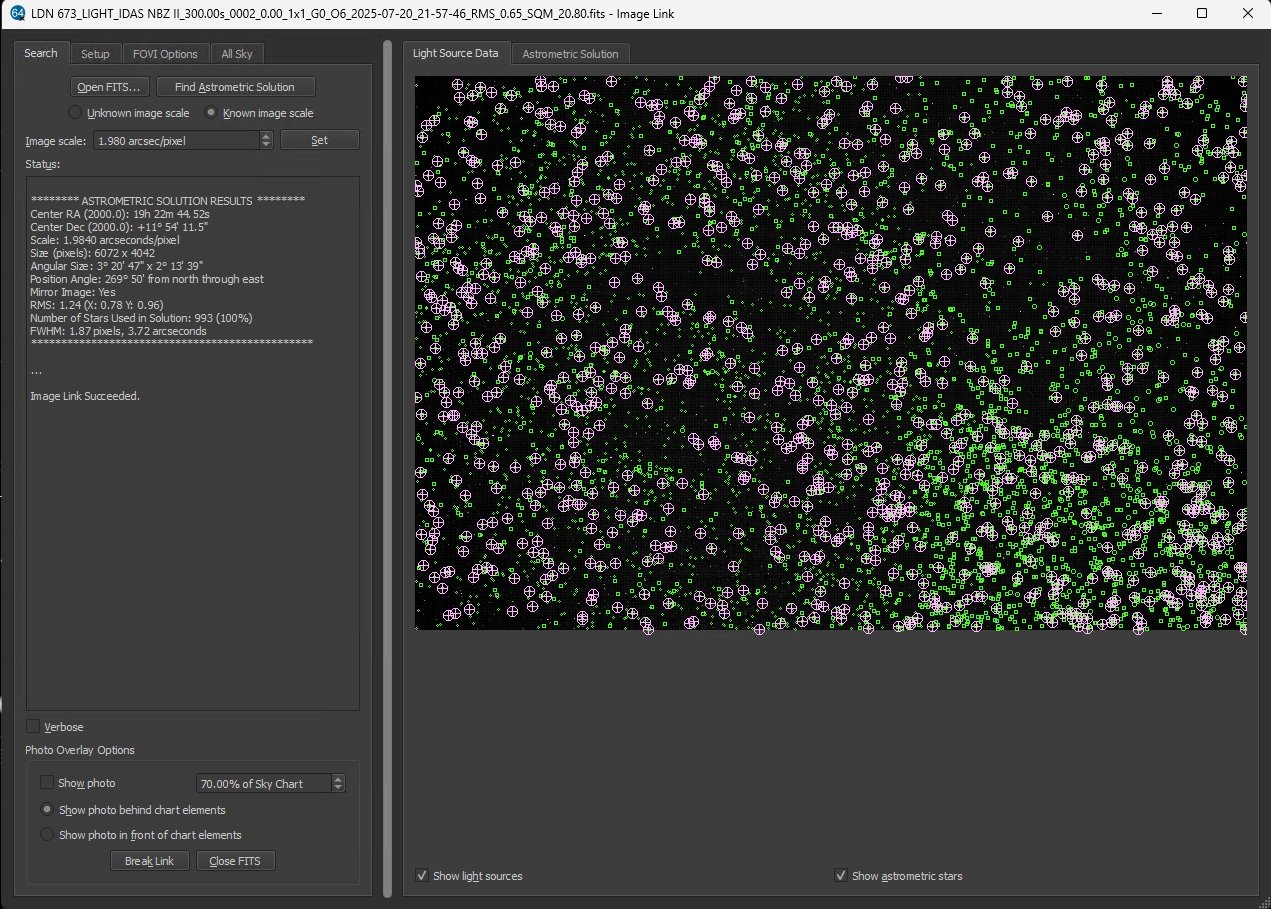
7. Image Link
Image Link is TSX’s built in platesolver. Even if you aren’t going to use TSX for data acquisition, Image Link still needs to be configured so that you can use Tpoint.
Make sure the telescope, camera, and focuser are connected to TSX
Make sure the camera is in focus
ALWAYS HOME THE MOUNT BEFORE THE FIRST SLEW OF A SESSION! Slew somewhere that isn’t the Northern Celestial Pole. You can do this by right clicking an area of the sky chart and selecting “Slew”
In the Camera tab, Check Automatically save photos, then take a 5s exposure
The FITS Viewer window will appear showing the exposure.
Right click the exposure and select “To Image Link”
The Image Link window will appear. Click the All Sky tab. If you don’t know your image scale select Blind. If you know your image scale select Use known image scale and enter.
Go back to the Search tab. If you didn’t enter your image scale check Unknown image scale. If you did, check Known image scale
Click Find Astrometric Solution. If you entered your image scale Image Link should solve within a couple seconds.
If the solve is successful the image link configuration is finished.
At this point the initial TSX setup is complete. You can now get into the imaging workflow where you will Tpoint, polar align, and train PEC. This guide is already long enough so I won’t get into details of the imaging workflow but I will include links to videos that cover those topics.
Polar alignment, Tpoint - https://youtu.be/4pbgJ24_01I?si=cEw-RJgOBuLeqYmK
Training PEC - https://youtu.be/b34eleZFrEE?si=Tp_Diuzh-S5nSEhE